Build A Decentralized Chat Application with Javascript & Rust (WebAssembly)
Creating a Dapp (decentralized app) takes a lot of research and implementation effort.
Countless hours need to be spent worrying about malicious users, secure p2p networking, security, and even governance when it comes towards building a Dapp.
With Wavelet, creating secure, resilient Dapps is surprisingly easy. By easy, we mean Firebase level of easy. About a hundred lines of straightforward code level of easy. Don't believe us?
Let's build a decentralized chat.
What we're going to be building
Like any great tutorial, it would be nice to see a live demo of what exactly you’re going to be building ahead of time.
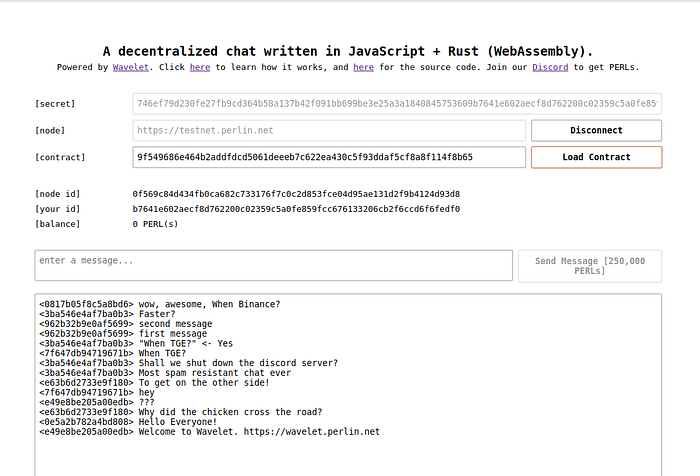
Head on over to https://perlin-network.github.io/decentralized-chat, and you should see this.

Enter your private key to your Wavelet wallet into the [secret] textbox, and make sure you have a minimum of 250,000 PERLs.
Press Connect, then Load Contract, and you should see messages made by other people.
Feel free to then fill in the message textbox with whatever message you want to send. Then simply press Send Message, pay some PERLs, and that’s pretty much it.
If you don’t have a private key, a Wavelet wallet, or 250,000 PERLs, keep reading and we will teach you what is a private key, how you can register your own decentralized Wavelet wallet, and how you can populate it with 250,000 PERLs.
The Backend
To start off, we need to have a place to store our chat messages. In a normal app you’d just host up a MySQL/Postgres/MongoDB database and make a NodeJS server to collect chat messages and stuff them in your database.
The pros? It works. The cons? With just a couple of dollars, someone could DDoS your database server down and keep your chat service down for ages.
Dapps use a blockchain to store data. That data gets spread throughout potentially hundreds or thousands of nodes in a mesh network, so that even if a hacker DDoS’ the majority of your blockchains network, your app would still remain secure and available.
The backend API that queries/stores/modifies data to your blockchain is what we call a smart contract.
So, the equivalent of a NodeJS HTTP API server and a MySQL database in this tutorial would be a Rust smart contract and Wavelet (our blockchain).
Let’s get started building a smart contract for our chat Dapp. If you haven’t already, you need to install Rust, alongside a WebAssembly compiler backend for Rust which may be installed by executing the following command:
❯ rustup target add wasm32-unknown-unknown
Right after, proceed to create your first Rust project by executing the following command, and take a bit of time searching up on how to install 3rd-party dependencies/libraries into your Rust project.
❯ cargo new --lib chat; cd chat
The dependencies for building Wavelet smart contracts are available in Rust’s package repository crates.io here and here.
You should have your project configuration file Cargo.toml look something like this:
[package]
name = "chat"
version = "0.1.0"
authors = ["Kenta Iwasaki <kenta@perlin.net>"]
edition = "2018"

[profile.release]
lto = true

[lib]
crate-type = ["cdylib"]

[dependencies]
smart-contract = "0.2.0"
smart-contract-macros = "0.2.0"
Now that we are all setup, let me just give it to you straight: here’s what the source code of our decentralized chat smart contract looks like.
use smart_contract_macros::smart_contract;

use smart_contract::log;
use smart_contract::payload::Parameters;
use std::collections::VecDeque;

struct Entry {
    sender: [u8; 32],
    message: String,
}

struct Chat {
    logs: VecDeque<Entry>,
}

const MAX_LOG_CAPACITY: usize = 50;
const MAX_MESSAGE_SIZE: usize = 240;

fn prune_old_messages(chat: &mut Chat) {
    if chat.logs.len() > MAX_LOG_CAPACITY {
        chat.logs.pop_front();
    }
}

fn to_hex_string(bytes: [u8; 32]) -> String {
    let strs: Vec<String> = bytes.iter().map(|b| format!("{:02x}", b)).collect();
    strs.join("")
}

#[smart_contract]
impl Chat {
    fn init(_params: &mut Parameters) -> Self {
        Self {
            logs: VecDeque::new(),
        }
    }

    fn send_message(&mut self, params: &mut Parameters) -> Result<(), String> {
        let entry = Entry {
            sender: params.sender,
            message: params.read(),
        };

        // Ensure that messages are not empty.
        if entry.message.len() == 0 {
            return Err("Message must not be empty.".into());
        }

        // Ensure that message are at most 240 characters.
        if entry.message.len() > MAX_MESSAGE_SIZE {
            return Err(format!(
                "Message must not be more than {} characters.",
                MAX_MESSAGE_SIZE
            ));
        }

        // Push chat message into logs.
        self.logs.push_back(entry);

        // Prune old messages if necessary.
        prune_old_messages(self);

        Ok(())
    }

    fn get_messages(&mut self, _params: &mut Parameters) -> Result<(), String> {
        let mut messages = Vec::new();

        for entry in &self.logs {
            messages.insert(
                0,
                format!("<{}> {}", to_hex_string(entry.sender), entry.message),
            );
        }

        log(&messages.join("\n"));

        Ok(())
    }
}
73 lines of code. That’s pretty much it (could be made smaller tbh). To explain a little bit what’s going on here:
The smart contract exposes two functions that may be called by our frontend: get_messages(), and send_message(msg: String).
The String param for send_message(…) is read using the param.read() function when declaring the entry variable. For more details on how inputs are specified into smart contracts, click here.
Chat logs are stored in a VecDeque (a double-ended queue where you can push items to the front of the queue, or to the end of the queue), which is initialized in init().
Each chat log contains a sender ID and a message. The sender ID is a cryptographic public key of the person who sent the chat message.
You call send_message(…) to place a chat log into the logs queue. Empty chat messages are not allowed, and chat messages may at most be 240 characters.
The logs queue has a capacity of at most 50 chat log entries. Should the queue be full when a new chat log is to be inserted into the queue, the queue removes the oldest message using logs.pop_front(). This logic is handled in the prune_old_messages() function.
You may call get_messages() to get a human-friendly readable version of a chatlog. Sender ID’s get printed out as a hex string, and are concatenated with the senders message contents.
Then a log!() macro is used to have the smart contract provide to your frontend all available chat messages from get_messages().
Let’s now build our smart contract using Rust’s Cargo tool:
❯ cargo build --release --target wasm32-unknown-unknown
… and if everything goes well, in the target/wasm32-unknown-unknown/release folder, you will see a chat.wasm file.
That is your smart contract, ready to be deployed on Wavelet’s blockchain.
Deploying the Backend
We need access to a Wavelet blockchain network to deploy our chat smart contract to.
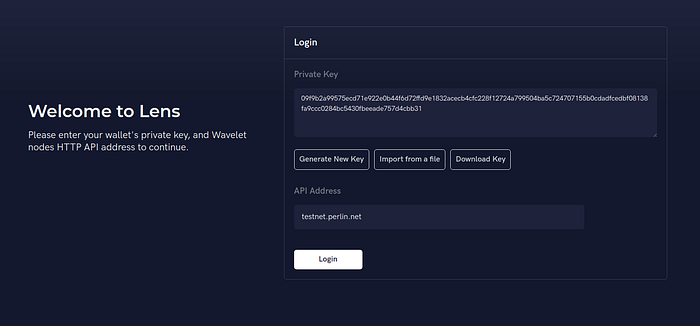
Fear not, we hosted one up for you to test your smart contracts out with. Head on over to https://lens.perlin.net/, and you’ll be faced with this login screen.

In case you have no knowledge of what a private key is, think of it as your password. Associated to your private key is a public key, which you can think of as your username.
In a blockchain, there exists the concept of accounts. You register an account by generating a new private key which is uniquely associated to a public key (which we alternatively also call a wallet address).
So long as you don’t give away your private key, it’s going to be very hard for a hacker to steal your account. So keep your private key safe. It is what gives you access to what you can consider your public identity/username.
Proceed to Login, and you’ll be logged into your Wavelet account. Take note of the Wallet Address on the top left, being your public key.
For a bit of background:
Each account holds PERLs, or what some of you might know as a cryptocurrency/virtual currency.
So you can think of your account as a wallet holding PERLs (hence why your public key is what we call a wallet address).
The reason we have this currency is because there is no free lunch: the nodes supporting the Wavelet network (in this case, the one we hosted) are willing to host/keep your smart contract alive in exchange for some PERLs.
The way this works is that every time anyone call send_message(…) in your contract, they need to pay some PERLs to the Wavelet network.
Thankfully, we provided an easy way for you or your friends to get some testing PERLs on the network we’ve hosted up so that you can test your chat app.
To get some PERLs, we have setup a Discord server which you can join here. In the server in the #wavelet-faucet channel, type:
$claim [your public key/wallet address here]
A bot would then send 300,000 PERLs to your provided wallet address. Type the message a couple more times, until you have about 500,000 PERLs, and you should be good to go.
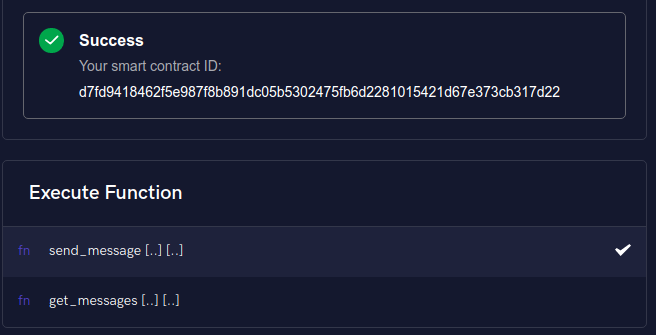
Head to the Developer page on the screen, press 75% button in the Gas Limit box, and upload your chat.wasm file there.

Wait a few seconds and you should see your smart contract ID. Make sure to jot it down/keep it for later, because we will need it to interact with our smart contract in our frontend.

And so with the push of a button, our smart contract is now live. Let’s now work on a front-end to spruce up our decentralized chat app.
The Frontend
I won’t recommend any particular frameworks like React or Vue or Svelte or teach you how to style your app; it’s entirely up to you. In this section, I’ll go over the core knowledge you need to hook up your website design to Wavelet.
To start off, each Wavelet node in the network hosts a HTTP API which we may connect to for interacting with/querying info from the ledger.
The API endpoint in particular for the network we hosted up for you all, which you used to register your account and deploy your smart contract in, is the following link: https://testnet.perlin.net
On npm it’s wavelet-client, with the source code for it being just a single file located on Github here: https://github.com/perlin-network/wavelet-client-js
Now, assuming you have async/await support set up, we can setup wavelet-client as follows:
import {Wavelet} from "wavelet-client";

const client = new Wavelet('https://testnet.perlin.net');
const wallet = Wavelet.loadWalletFromPrivateKey("YOUR_PRIVATE_KEY_HERE");

const contract = new Contract(client, "YOUR_CONTRACT_ADDRESS_HERE");
await contract.init();
Simply, what the above code lets us do is:
- connect to the Wavelet network,
- load our wallet by giving our private key so that we may pay for the fees to use our smart contract, and
- construct a
Contractinstance which provides methods to help us with interacting with our smart contract.
Calling get_messages()
Before continuing any further, one thing to note is that out of the two smart contract methods we defined:
- only one of them modifies the blockchain to push a new chat log, while
- the other only simply queries the blockchain to retrieve all chat logs made thus far.
It is good to know that the only smart contract methods which you have to pay nodes PERLs for to execute are ones that modify the blockchain.
So, as an example, the get_messages() function can be called without incurring any cost of PERLs to your account. You can call it like so:
import JSBI from "jsbi"; // Make sure to add this as a dependency!

console.log(contract.test(wallet, 'get_messages', JSBI.BigInt(0));
From the code above, you might immediately be wondering: what is this additional JSBI.BigInt(0) parameter provided?
When calling a smart contract, apart from passing in input parameters, you may additionally simultaneously send the contract some of your PERLs.
A reason why you would want this functionality is because, for example, you might make it that certain smart contract methods only execute should 500 PERLs be sent to the contract beforehand.
In this case we don’t want to send our smart contract any PERLs (we’re just making a chat app 😅) upon invoking get_messages(); so we simply set the amount of PERLs to send to the contract to be zero.
Now, after executing the code above, you should see the following in your browsers console: {"result": null, "logs": []}
To explain the console results, what the log!(…) macro does, which we used in building our smart contract, is place logs as strings in the “logs” array.
On the other hand, the “result” object is set to be the returned result/error from your smart contract function.
Hence, since we didn’t send any chat messages yet, the “logs” array is empty, and the “result” object is null.
Only after we call send_message a couple of times and re-call get_messages will we then see our messages in the “logs” array.
Digging a little further, should you be interested in knowing how contract.test works, what it does behind the scenes is:
- download your smart contracts latest memory from the node you are connected to,
- load the smart contracts code and memory into your browsers virtual machine, and
- locally executes the get_messages() function and returns all printed logs and results.
Calling send_message(msg:String)
Now, let’s talk about calling the send_message(msg: String) function. As you might guess, calling this function modifies the blockchain by putting your desired message on the blockchain, and thus costs PERLs.
The way it may be called with the Wavelet JS client is actually pretty similar to the code for get_messages():
await contract.call(
  wallet,
  'send_message',
  JSBI.BigInt(0), // amount to send
  JSBI.BigInt(250000), // gas limit
  JSBI.BigInt(0), // gas deposit (not explained)
  {type: "string", value: "Your chat message here!"},
);
Everything is the same, except you pass in your wallet as the first parameter, and you specify your message as as an input parameter encoded as an object like so:
{type: "string", value: "Your chat message here!"}
Just to put it out there, should you ever make a smart contract function outside of the scope of this tutorial that requests multiple parameters, you may pass multiple input parameters as a variadic list to the contract.call function like so:
await contract.call(...[
  {type: "uint32", value: 32}, // Pass in an unsigned little-endian 32-bit integer.
  {type: "int64", value: JSBI.BigInt(-100000000)}, // Pass in a signed little-endian 64-bit integer.
  {type: "string", value: "Another string"}, // Pass in a string.
  {type: "raw", value: "hexadecimal_string_here_to_be_decoded_into_raw_bytes"}] // Pass in raw bytes hex-encoded.
)
Now, much like the odd JSBI.BigInt(0) passed in, you might be wondering what the second JSBI.BigInt(250000) passed in is for.
In order to make sure you do not spend too much PERLs accidentally executing your function, you can set a limit to how much PERLs may attempt to be spent on executing your smart contract function.
In this case, what the code above denotes is that your call to send_message() would at most expend 250,000 PERLs.
The explicit PERL fee you pay for executing a modifying smart contract call is computed based on how many instructions your smart contract has to execute to fully execute the smart contract method you desire.
More details on the fee structure when it comes to executing smart contract methods may be found here.
Listening for changes to the blockchain
The one final bit perhaps that would be great to have is to automatically refresh the chat logs when new chat logs are appended to the blockchain.
Updates are batched and then published together inside Wavelet into what is called a “consensus round”. So everytime the blockchain gets modified, after a second or two, a “consensus round” ends/passes.
We can use the Wavelet JS client to listen for when a round ends, download the latest updated smart contract memory, and re-execute get_messages() to collect the latest chat logs which we may update our frontend with like so:
await client.pollConsensus({
    onRoundEnded: msg => {
        (async () => {
            await contract.fetchAndPopulateMemoryPages();
            console.log("Chat logs updated:", contract.test('get_messages', BigInt(0)));
        })();
    }
});
In the code above, what is happening is that the fetchAndPopulateMemoryPages() function is called every single time a consensus round ends. The function downloads your smart contracts latest memory data.
What then follows is a single call to get_messages(), providing you with the latest logs and results being printed straight to your browsers console.
Conclusion
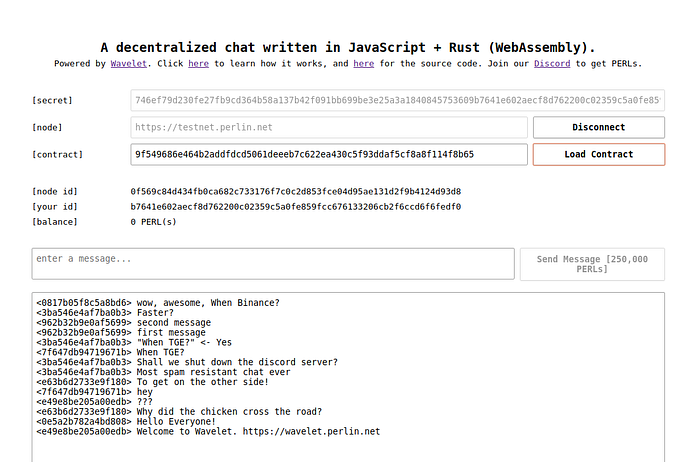
So with all of these different components, you now have a full-fledged decentralized chat app with a splendid backend and (hopefully splendid) frontend.
Hopefully, after a bit of cleanup, it looks a little something like this:

If it doesn’t, either way, congratulations, you've made your very first scalable, secure, Wavelet Dapp!
If you need any help, are interested to know more, or are stuck at any bits throughout the tutorial, feel free to reach us over on our Discord here.
Source code for the entire tutorial can be found here
The original tutorial is written by Kenta Iwasaki and can be found here.